Welcome back to BioggingDen, where we break down complex tech and AI trends into easy-to-digest guides for beginners.
If you are looking for a complete guide on ChatGPT API for beginners, you are in the right place. Learning how to use the ChatGPT API is the best starting point to integrate artificial intelligence into your own applications, websites, or automated workflows. Unlike the standard chat interface on the web, the OpenAI API allows developers and beginners alike to power custom software with advanced language models programmatically.
In this comprehensive, beginner-friendly guide brought to you by BioggingDen, we will walk beginners through everything from creating an account to writing your very first API call using Python.
1. What is the ChatGPT API and Why Use It?
The ChatGPT API (Application Programming Interface) is a bridge provided by OpenAI that lets your applications communicate directly with GPT models. Here at BioggingDen, we often emphasize how this unlocks powerful features:
- Automation: Automatically generate emails, summaries, or customer support responses.
- Customization: Build your own dedicated AI chatbots tailored to specific business or personal needs.
- Scalability: Process hundreds of text requests in the background without manual intervention.
Important Note: A common beginner misconception is that a ChatGPT Plus subscription includes API access. They are separate billing products; the API operates on a flexible, pay-per-token usage model.
2. Step 1: Get Your OpenAI API Key
Before writing any code, you need a secret key to authenticate your requests.
- Go to the official OpenAI Platform Website and log in or create an account.
- Navigate to your user dashboard and click on API keys in the menu.
- Click the “Create new secret key” button.
- Give your key a recognizable name (optional) and click confirm.
- Copy your secret key immediately and store it securely. OpenAI will never show it to you again! If you lose it, you will need to delete it and generate a new one.
3. Step 2: Set Up Your Development Environment
For this tutorial, BioggingDen recommends using Python, which is the most popular language for AI development due to its simplicity. Make sure you have Python installed on your computer.
Install the Official OpenAI Library
Open your terminal or command prompt and run the following command to install the official OpenAI Python package:
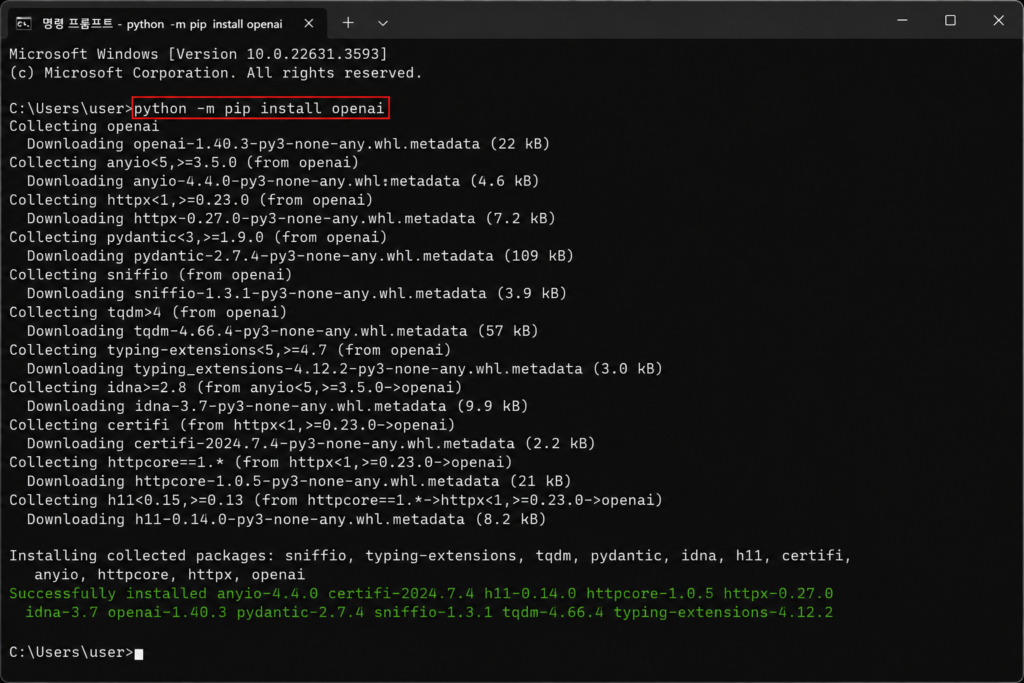
(If you need help setting up Python for the first time, you can refer to the official Python Getting Started Guide.)
4. Step 3: Write Your First API Call
Once your environment is ready, you can write a simple script to send a prompt to ChatGPT and receive a response.
Create a file named app.py and paste the following Python code:
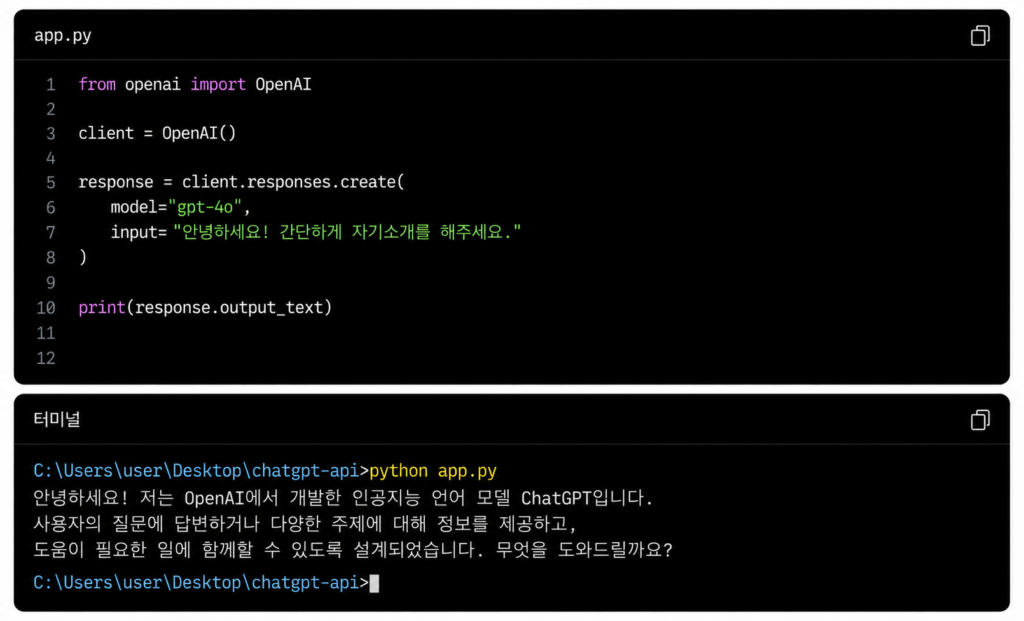
Understanding the Code Structure:
client = OpenAI(...): Authenticates your script using your unique secret key.model: Specifies which OpenAI model to use (e.g., cost-effective models likegpt-4o-minior flagship models).messages: This array defines the conversation context.system: Sets the behavior or persona of the AI.user: The actual question or command input from the human.
5. Understanding ChatGPT API Pricing for Beginners
A vital part of working with APIs is keeping track of costs. OpenAI charges based on tokens (pieces of words processed as input and output).
- Input Tokens: The prompt and instructions you send to the model.
- Output Tokens: The text generated back by the AI.
- Cost Control Tips for Beginners: Always monitor your usage dashboard, set hard/soft spending limits, and use lighter models for simple, high-volume automation tasks to keep expenses close to zero for personal projects. For more details on model pricing, check the official OpenAI Pricing Page.
Conclusion
Integrating the ChatGPT API opens up endless possibilities for building intelligent applications, automated pipelines, and customized chat interfaces. By securing your API key, installing the official Python library, and structuring your prompts correctly, beginners are well on the way to becoming AI developers.
Once you get comfortable building basic scripts, you can even take your skills further by exploring how to generate revenue—check out our guide on Passive Income with AI: 5 Ways to Build a Profitable Digital Business to see how these automated tools translate into real-world projects.
Thank you for reading this guide on BioggingDen! Have questions about setting up your script? Let us know in the comments below!